Tuesday 29 August 2017

Loving Dad - Father's Day Layout

Tuesday, August 29, 2017 0 Comments

 Loving Dad - Father's Day Layout

#artdecocreations   #couturecreationsaus    #ultimatecrafts  

Hi everyone! It's Julie here back on the blog today sharing a clean and simple layout that I have created using the The Ritz collection from Ultimate Crafts. With Father's Day just around the corner, I thought it was the perfect time to use some of the new and soon to be released chipboard pieces from Couture Creations.


To start I took one sheet from each of The Ritz 12x12 paper pads - Gatsby, Evening Cocktail and Theatre. If you don't have all three paper pads then you could use three papers from the one pad. Choose one pattern that contrasts the other two.


I've cut the three papers down and arranged as shown in the photo below. The largest piece and second largest piece are both matted onto Ultimate Crafts Obsidian Cardstock.


I took some of the Couture Creations 6mm double sided tape and stuck it down around the entire piece of gold and black patternedd paper. It should be positioned so it sticks out from underneath the lightest patterned paper piece as a faux layer.


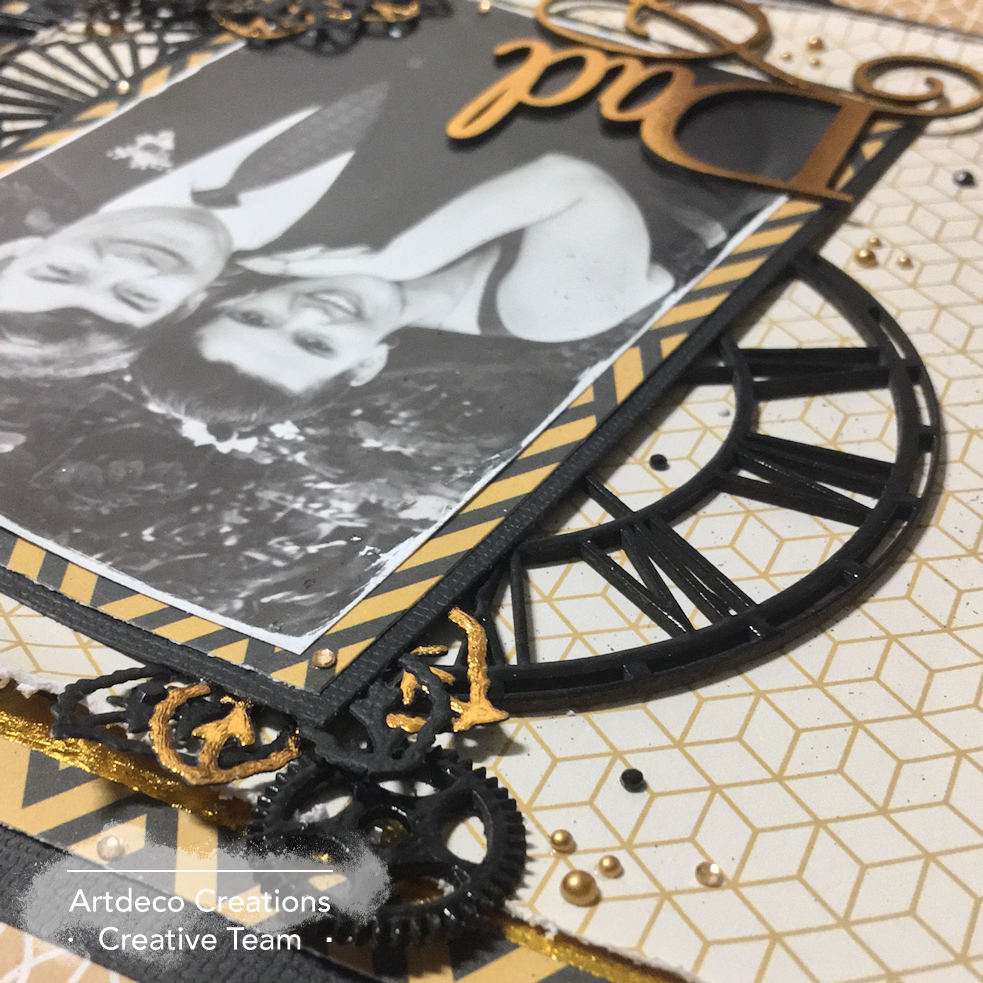
Next I took the Loving Dad chipboard and covered it using Heat Activated Foil in Gold Mirror. I did this using the GoPress & Foil Machine. The combination I used is: Metal adapter plate, foil coloured side down, chipboard piece placed face down and a carstock shim. You will see in one of my photos below just how shiny and beautiful heat foiled chipboard turns out.


I then took some of the Mini Cogs chipboard and the large clock from the Clockface Set and heat embossed using Midnight Black Super Fine embossing powder.


I then die cut some Obsidian cardstock using the Classy Flower Die and Waves Border Die. I also used the leaves die from the Magnolia Lane Rose Cutting Impressed Die Set to add to the flower. The flower and leaves were cut a second time using Die Cut & Bond tape adhered to some Obsidian cardstock. The adhesive backing removed and some gold foil adhered to the sticky die cuts. To finish, I added some pearls and gemstones around the page and in the centre of the mini cogs.


Black gemstones
Large gold gemstone


Thanks for stopping by, I hope that you enjoyed this tutorial.
Until next time.
Happy Crafting!

Friday 18 August 2017

Bohemian Bouquet A Time to Remember Layout

Friday, August 18, 2017 0 Comments

 Bohemian Bouquet A Time to Remember Layout

#artdecocreations   #couturecreationsaus    #ultimatecrafts  

Happy Monday crafty friends! It's Julie here on the blog starting the week off with a layout using papers from the soon to be released Bohemian Bouquet Collection from Ultimate Crafts. Today you will also get a sneak peek of the new chipboard range from Couture Creations. Yes, you read that right. Couture Creations will be releasing their very own chipboard range! Who doesn't love chipboard? I know I do and I've included a few pieces on my layout to show how to collections can work together very easily.


To start, I've taken some patterned paper from the Bohemian Bouquet 12x12 paper pad, trimmed off a quarter of an inch from each side and matted onto a piece of Ultimate Crafts 12x12 Cardstock in Garnet.


I had some leftover pieces of the Bohemian Bouquet 6x6 paper pad from the card set that I made (in my previous blog post) and bundled them together to form the photo mat.


I've taken one of pieces of patterned paper and embossed it using the Bohemian Bouquet 5x7 Bohemian Bazaar Embossing Folder. I gently ran a brown ink pad over the paper to highlight the embossed patten.


I've used the Bohemian Bouquet Chipboard Fine Doily Chipboard Set (outer piece only) and Geo Flower Chipboard Border embellishments and heat embossed using Couture Creations Chunky Gold Crystals. As you can see from the photo, the embossing powder was a little hit and miss so I gave it another coat and came out perfect.


At this point I thought I was finished but when we got the go ahead to start using the new chipboard I thought why not add some more? Here I've taken the Couture Creations Time to Remember, Classic Flourish and Victorian Corner pieces and coated each piece twice with Couture Creations Metallic Rose Gold embossing powder. This powder is very fine so you will need at least two coats for a lovely finish.


I then added some of the Couture Creations English Roses along with some flowers, leaves, lace, twine and trim from my stash. The big flower is a discontinued Couture Creations brand, but you could very easily use the Camden Beaded Cottage Flower and colour it using Couture Creations Anna Griffin Pigment Powder, Ultimate Crafts Liquid Drops or ink. To finish, I've added some Couture Creations 2mm Gemstones in Celadon and 2mm Pearls in Deep Red.

Here is my finished layout.


Artdeco Creations Products Used:
ULT158030 Ultimate Crafts Bohemian Bouquet 12x12 paper pad
 ULT158031 Ultimate Crafts Bohemian Bouquet 6x6 paper pad
ULT158033 Ultimate Crafts Bohemian Bouquet 5x7 Embossing Folder - Bohemian Bazaar
ULT158367 Ultimate Crafts Bohemian Bouquet Chipboard - Fine Doily Chipboard Set
ULT158371 Ultimate Crafts Bohemian Bouquet Chipboard - Geo Flower Chipboard Border
ULT200067 Ultimate Crafts Cardstock - Garnet
CO725875 Couture Creations Chipboard - Classic Flourish
CO725889 Couture Creations Chipboard - Time to Remember
CO725897 Couture Creations Chipboard - Victorian Corner
CO724289 Couture Creations English Roses (2cm)
CO724966 Couture Creations Embossing Powder - Chunky Gold Crystals
CO724975 Couture Creations Embossing Powder - Metallic Rose Gold
 CO724154 Couture Creations 2mm Gemstones - Celadon
CO725369 Couture Creations 2mm Pearls - Deep Red

Other Products:
Pearls
Lace/Trim/String
Flowers/Leaves

Thanks for stopping by, I hope that you enjoyed this tutorial.
Until next time.
Happy Crafting!

Wednesday 9 August 2017

Bohemian Bouquet Foiled Card Set

Wednesday, August 09, 2017 0 Comments
#artdecocreations   #couturecreationsaus    #ultimatecrafts  

Happy Wednesday Crafters! It's Julie here back on the blog today sharing a set of cards that I have made using papers from the soon to be released Bohemian Bouquet Collection from Ultimate Crafts. I've combined these with the Ultimate Crafts Sweet Sentiments Hot Foil Stamps to show how you can easily create a set of cards for any occasion.


To start, I've taken some patterned paper from the Bohemian Bouquet 6x6 paper pad, cut down and matted each piece onto coordinating cardstock. For these cards (going clockwise) I've used Ultimate Crafts Garnet, Bubblegum, Green, Blue cardstock. These panels were cut to size to fit onto the Couture Creations White A6 Card and Envelopes.


I've taken more sheets from the Bohemian Bouquet 6x6 paper pad and cut a 2 inch piece from each sheet, again matting them onto coordinating cardstock. Two will be going vertical and two horizontal as shown below.


Next I've used some of the leftover scraps of paper and heat foiled a sentiment onto each piece, again matted onto coordinating cardstock. 


All that was left to do was assemble each card and then add some bling and a bow. Here are the finished cards showing how I have assembled and embellished each one. Each sentiment panel was adhered using foam tape to give some dimension. You can just use normal double sided tape if you prefer to leave your cards flat for mailing.


"To a Special Mum" Card


"Thanks" Card


 "You're Amazing" Card


"Let's Celebrate Your Birthday" Card


Artdeco Creations Products Used:

 "To a Special Mum" Card
 "Thanks" Card
  "You're Amazing" Card

Other Products:
Bling pieces
Organza Ribbon


Thanks for stopping by, I hope that you enjoyed this tutorial.
Until next time.
Happy Crafting!

Tuesday 1 August 2017

The Ritz Explosion Box Card

Tuesday, August 01, 2017 0 Comments
#artdecocreations   #couturecreationsaus    #ultimatecrafts  

Hi everyone! It's Julie here back on the blog today sharing an explosion box card that I have created using the The Ritz collection from Ultimate Crafts. This design is generic so it can be used for any occasion from an 18th or 21st Birthday, an Engagement, Wedding or a milestone birthday or anniversary event.

For today's tutorial I'm focusing on The Ritz collection and how I have used the Ultimate Crafts Die Cut & Bond tape with the Couture Creations Heat Activated Foil to create beautiful embellishments for my explosion box. If you would like to see more details on how I created this piece, pop on over to my blog for a more in depth tutorial. There are loads of explosion box templates available online, the one I have used will be on my blog post. If you already have a template that you like, you can certainly use that and then decorate the box using the same papers, dies and embellishments as I have on mine.


For the die cut embellishments adhere a strip of the Die Cut & Bond tape onto a scrap piece of cardstock and cut out the die shape. For this tutorial, I only wanted the decorative piece of this die so I only cut that part.


Next, remove the backing from the die cuts and place onto a sheet of foil. I have used the Gold Mirror foil for this project.


Turn the foil over and rub over the die cuts firmly until enough foil has covered each piece. You should be able to clearly see the outline of the die cut through the foil.


You should end up with a die cut looking like this. The foil comes out beautifully (better in real life). It's best to use smooth cardstock for this technique as you will avoid having to touch up your piece like mine below. You could also leave it like this to give your embellishment a distressed look. Either way still looks great.


If this happens to you while you are foiling your die cut, just remove the piece of backing left behind and simply press the foil over the die cut again. No one will ever know! :)


Here is how the die cut and foiled embellisments turned out on my finished piece.


Other Products:
Gold Ink
Large gemstone


Thanks for stopping by, I hope that you enjoyed this tutorial.
Until next time.
Happy Crafting!

(C) 2023 Julie's Craft Haven. All Rights Reserved.