Wednesday 20 December 2017

Where Have the Years Gone?

Wednesday, December 20, 2017 0 Comments

Where Have the Years Gone?

#artdecocreations   #couturecreationsaus    #ultimatecrafts

Hi everyone! It's Julie here back on the blog today sharing a layout I created using the Bohemian Bouquet collection from Ultimate Crafts and chipboard from Couture Creations.

Take the following sheets from the 12x12 paper pad, cut out the circle from one of the pages and adhere to the base. Distress both layers. Next take the two main pieces from the decoupage sheets, cut them down and adhere on the circle to frame the photo. Cut a heart paper doily in half and placed underneath the circle layer as shown.


Ink the chipboard sentiment with red ink as a base colour then cover with Hot Pink Glitzin' Glamour.


For the frame, ink with a dark grey ink then coat with watered down black pigment powder.


Next add some flowers, black lace and a blue butterfly embellishment from the collection.


Use the Crystal 2mm gemstones in clusters around the page and Bubblegum 2mm gemstones in the flower centres on the circle layer as shown.


Here is a close up of the finished layout.


PRODUCTS USED TO CREATE THS PROJECT:

Bohemian Bouquet Collection:
12x12 Paper Pad
Decoupage Sheets
Blue Layered Butterflies

Chipboard:
Where Have the Years Gone?
Elegant Frame Set

Ooh La La Collection:
Heart Paper Doilies

Magnolia Lane Collection:
Black Decorative Lace

Artdeco Creations Products:
Tie Dyed & Jewelled Florettes 2.5cm
Tie Dyed & Jewelled Florettes 3cm
Tie Dyed & Jewelled Florettes 4cm
La Belle Vintage Blooms
2mm Crystal Gemstones
2mm Bubblegum Gemstones
Hot Pink Glitzin Glamour
Black Pigment Powder

Other:
Bling
Grey Ink
Red Ink

Thanks for stopping by, I hope that you enjoyed this tutorial.
Until next time.
Happy Crafting!

Monday 18 December 2017

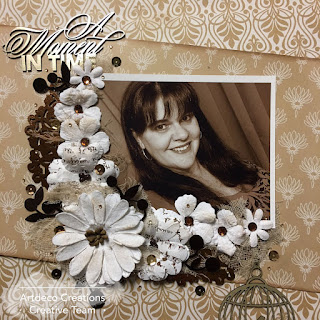
A Moment in Time

Monday, December 18, 2017 0 Comments

A Moment in Time

#artdecocreations   #couturecreationsaus    #ultimatecrafts 

Hi everyone! It's Julie here back on the blog today sharing a layout I created using The Ritz collection from Ultimate Crafts and chipboard along with hotfoils and the GoPress & Foil Machine from Couture Creations.

Take two patterned pieces from The Ritz "Theatre" 12x12 paper pad and cut the first piece down to 10"x 12" and the second piece to 6"x 12". Ink all layers with a matching light brown ink and adhere to a piece of Delicate Medlar cardstock as shown.


Take one of the Hanging Cages and the Moment in Time chipboard pieces and foil with Champagne hotfoil.


Take the Ornate Doily chipboard and foil with Chocolate Copper hotfoil. Cut this in half and arrange on the layout to the left and bottom of your photo.


Add some flowers, sequins, 2mm gemstones and muslin on your layout to frame your photo.
\

Next take the Berried Branch chipboard and foil with Chocolate hotfoil. Cut into pieces and arrange around the layout as shown. Use a brown alcohol marker to colour the gemstones on the flowers.


Here is a close up of the finished layout.


PRODUCTS USED TO CREATE THS PROJECT:

The Ritz Collection:
"Theatre"12x12 Paper Pad

Chipboard:
A Moment in Time Set
Hanging Cages Set
Berried Branch
Ornate Doily

GoPress & Foil Hotfoils:
Chocolate
Chocolate Copper
Champagne

Ooh La La Collection:
Sequins

Artdeco Creations Products:
Delicate Medlar Cardstock
Tie Dyed & Jewelled Florettes 2.5cm
Tie Dyed & Jewelled Florettes 3cm
Tie Dyed & Jewelled Florettes 4cm
La Belle Vintage Blooms
Beaded Flower with Script Print
2mm Golden Touch Gemstones

Other:
muslin
light brown ink
brown alcohol marker

Thanks for stopping by, I hope that you enjoyed this tutorial.
Until next time.
Happy Crafting!

Wednesday 13 December 2017

Follow Your Heart

Wednesday, December 13, 2017 0 Comments
Hi everyone!

Today I'm sharing a layout that I created for Bella Paperie using the beautiful "Violet Silence" collection from LemonCraft. I love this collection, the patterns are gorgeous and it's in my two favourite colours - pink and purple!

Here is my finished layout plus close up photos.


Products Used:
LemonCraft "Violet Silence" Collection papers
2Crafty Chipboard - Follow Your Heart
Prima Marketing - Metallique Crocus Fields
Texture Paste
TCW Stencil - Art Script Stencil (6x6)
Amsterdam Ink - White
Memento Ink - Grape Jelly
Ranger Stickles -  Purple
Flowers, Trims and Metal Heart from Bella Paperie
Pearls and Gemstones
Purple sequins


Thanks for stopping by!

Monday 4 December 2017

You Are Beautiful - Foiled Bohemian Card

Monday, December 04, 2017 0 Comments

You Are Beautiful - Foiled Bohemian Cards

#artdecocreations   #couturecreationsaus    #ultimatecrafts  

Hi everyone! It's Julie here back on the blog today sharing a clean and simple card using the GoPress & Foil Machine from Couture Creations.


To start I've taken the Orchid Box hotfoil stamp and placed it onto my GoPress & Foil Machine to heat up. Using some Phantom Purple hotfoil, I've foiled onto a smooth piece of white cardstock.


I've used the largest die from the Victorian Squares nesting die set to cut out the hotfoiled image. This shape works perfectly with both the Orchid Box die and hotfoil stamp. I've tacked it down with washi tape to hold in place. Note: The Victorian Squares set has been discontinued but is still available in some stores.


This particular die is the largest in this set. To create a backing layer, place the same die onto the back of some purple glitter cardstock. Tack down with wash tape.


Trace around the outside of the die and cut out the shape.


 Adhere to the glitter cardstock using strong adhesive tape or glue. Then adhere to the front of the card with foam tape or dots.


Cut the Orchid Box die using purple glitter cardstock. Trim off the four "orchids" and adhere each one underneath the main panel as shown.


 For the sentiment, foil the Beautiful Inside and Out hotfoil stamp onto some smooth white cardstock using more of the Phantom Purple hotfoil. Trim down and adhere to some purple glitter cardstock. Adhere to the centre of the focal piece using foam tape or dots.


  Add some 2mm Crystal gems as shown to complete the card.


PRODUCTS USED TO CREATE THS PROJECT:

ULT158080 Orchid Box Hotfoil Stamp
ULT158070 Orchid Box Die

Artdeco Creations Products:
AD90018 Square Card
ULT158088 Beautiful Inside and Out Hotfoil Stamp
CO724845 Square White Card
CO724156 2mm Gemstones Crystal
CO723048 Victorian Square Nesting Dies (discontinued)
 
Other:
Purple glitter cardstock

Thanks for stopping by, I hope that you enjoyed this tutorial.
Until next time.
Happy Crafting!

Friday 1 December 2017

White With 1 December Challenge

Friday, December 01, 2017 0 Comments

Hi everyone! Today I'm sharing my December inspirational piece for White.. With 1. The colour for December is Watermelon Red and there is also a sketch to follow for inspiration this month.

White.. With 1 challenges require your layout to be at least 85% white PLUS the specified challenge colour for that particular month. You can use black (or dark brown) as an accent colour on your layout but it must not be the dominant colour, unless it is the specified colour for that month. The full WW1 challenge rules can be found here. This year there will also be either a mood board for inspiration or a sketch to follow.


White.. With 1 Challenges are sponsored by:


You have a chance to win an EXCLUSIVE Mystery kit from THE RESIN RAINBOW based each month on our own monthly colour here at White..with 1.  One of these amazing kits will be put aside for one lucky Australian / New Zealand entrant who will be chosen by creative team vote.


Our random draw winner up each month will receive a delightful selection of handmade embellishments, flairs and flowers (chosen from amongst these) from SCRAPPERS GARDEN.  Some beautiful creations here and available from her STORE.


Thanks for stopping by!

Thursday 30 November 2017

(C) 2023 Julie's Craft Haven. All Rights Reserved.