Sunday 23 January 2022

Summer Holiday Layout Tutorial for Uniquely Creative

Sunday, January 23, 2022 0 Comments
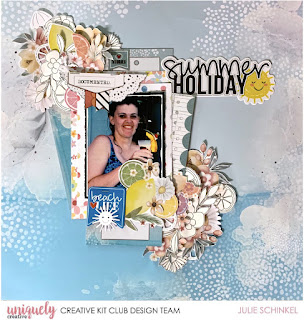
Hi everyone, today I'm sharing a tutorial blog post created for Uniquely Creative using the Summer Days collection. This collection is perfect for summery beach and holiday photos. The original tutorial can be seen on the Uniquely Creative blog HERE.
 
 
1. Cut a 1" frame from some coloured cardstock of your choice. Julie has used dark blue to match her swimsuit as that’s the colour that pops in the photos.
 
2. Trim a piece of the Garden Party paper down to 11.5” x 11.5” then cut a 1" frame from that piece.
 
3. Cut another 1" frame from the same coloured cardstock - you should be able to use the centre piece cut out earlier.
 
4. Trim a piece of the Summer Cocktails paper down to 10.5” x 10.5”. Adhere all pieces together to form the layout base.


5. Distress the edges of your photos using a sanding block, then mat onto some of the cardstock colour of choice. Adhere to the middle of the layout base, overlapping as shown. 


6. Fussy cut some of the floral elements from the Citrus Blooms Fussy Cut paper and die cut the sun from white cardstock using the Summer Icons die set.


7. Adhere the fussy cut pieces as shown.


8. Recolour the word “holiday” from the Creative Cuts using a fine tip marker. Depending on what colour cardstock you have used, recolouring the word to match may not work over the original light blue colour. If this is the case, use black to recolour the word.
 
9. Colour the little sun die cut using light and dark yellow Uni-Colour marker (or similar). Colour the centre with the darker yellow blending out to the lighter yellow on the sun rays. Coat with Glossy Accents, set aside to dry then adhere to the layout.


10. Adhere the word “summer” and flowers from the Summer Holiday Laser Cut


Products Used: 
UCP2301 Summer Cocktails
UCP2304 Garden Party
UCP2307 Citrus Blooms Fussy Cuts
UCP2311 Creative Cuts
UCE1727 Laser Cut
UCD2028 Summer Icons Dies
 
Other Products Used:
UNIQOLOUR Markers (Light & Dark Yellow)
Trimmer, Scissors
Adhesive Tape
Glue Blue Pen (or colour of choice/black)
Glossy Accents
White Cardstock (for die cut)


Thanks for stopping by, happy crafting.

Friday 21 January 2022

Summer Holiday Layout Tutorial for Uniquely Creative

Friday, January 21, 2022 0 Comments
Hi everyone, today I'm sharing a tutorial blog post created for Uniquely Creative using the Summer Days collection. This collection is perfect for summery beach and holiday photos. The original tutorial can be seen on the Uniquely Creative blog HERE.
 
 
1. Use a piece of Day at the Beach paper as the base. 
 
2. Distress the edges of your photo using a sanding block. Matt onto some black cardstock cut and trim down with a deckle edge trimmer or deckle scissors.
 
3. Adhere onto a piece of the Summer Cocktails paper, trim down to leave a quarter inch border.
 
4. Adhere onto a larger piece of the Garden Party paper again trimming down leaving a quarter inch border.
 
5. Pick the two blue cards from the 6x4 Pocket Pack. Cut down as shown, these will form the matting layers underneath the photo. I didn’t end up using the two middle pieces, but you can still include these if you wish.


6. Adhere all of the pieces to form the photo mat cluster as shown.


7. Adhere some elements from the Creative Cuts, Cut-a-Part Sheet, and the Watercolour Cut-a-Part Sheet and Citrust Blooms Fussy Cut paper as shown. Attach the “Document” and “Beach Life” elements right over the printed staples on the image using a tiny attacher or stapler.


8. Die cut a few of each element from white cardstock using the Summer Icons die set. Adhere one sun icon die cut to the “Beach Life” element.


9. Add the “Summer Holiday” title from the Creative Cuts to the layout as shown.
 
10. Add random die cut elements from the Summer Icons die set to the top and bottom clusters as shown.


Products Used:
 UCP2305 Day at the Beach
UCP2301 Summer Cocktails
UCP2304 Garden Party
UCP2307 Citrus Blooms Fussy Cuts
UCE1873 6x4 Pocket Pack
UCE2311 Creative Cuts
Cut-A-Part Sheet
Watercolour Cut-A-Part Sheet
UCD2028 Summer Icons Dies
 
Other Products Used:
Trimmer, Scissors
Adhesive Tape
Glue
Black Cardstock (for photo mat)
White cardstock (for die cuts)
TH Deckle Edge Trimmer/Deckle Scissors
Sanding Block
TH Tiny Attacher/Small Stapler
Die Cutting Machine


Thanks for stopping by, happy crafting.

Wednesday 19 January 2022

Thursday 13 January 2022

Smile Layout for 3Quarter Designs

Thursday, January 13, 2022 0 Comments
Hi everyone, I'm sharing another layout for 3Quarter Designs using their amazing Grunge Reinvented collection. This collection is a revamp of one of 3Quarter Designs very first collections which was very popular then, as I'm sure this new and improved version will be too. It can be used for both masculine and feminine projects as I have with my two layouts. The first is a masculine layout using both the papers and chipboard from the collection.
 
Here is my completed layout plus close ups so you can see how I've created and embellished the page.


Thanks for stopping by, until next time happy crafting!

Sunday 9 January 2022

Love Layout for 3Quarter Designs

Sunday, January 09, 2022 0 Comments
 Hi everyone, today I'm sharing another layout for 3Quarter Designs using their amazing Dystopian Dahlia collection. This collection has a floral steampunk theme with vibrant pops of orange that work beautifully with the brown tones. This collection can be used for both feminine and masculine projects very easily.

Here is my completed layout plus close ups so you can see how I've created and embellished the page.


Thanks for stopping by, until next time happy crafting!

Wednesday 5 January 2022

Blessed Layout for 3Quarter Designs

Wednesday, January 05, 2022 0 Comments
 Hi everyone, today I'm sharing a layout for 3Quarter Designs using their amazing Dystopian Dahlia collection. This collection has a floral steampunk theme with vibrant pops of orange that work beautifully with the brown tones. This collection can be used for both feminine and masculine projects very easily.

Here is my completed layout plus close ups so you can see how I've created and embellished the page.


Thanks for stopping by, until next time happy crafting!

Monday 3 January 2022

Life and Happiness Layout for 3Quarter Designs

Monday, January 03, 2022 0 Comments
 Hi everyone and Happy New Year! Well wasn't 2021 a year and a half? We're finally into 2022 and some big things are coming our way this year. All will be revealed soon!
 
 Now onto all things crafty. Today I'm sharing my first layout as a Design Team member for 3Quarter Designs using their amazing Grunge Reinvented collection. This can be used for both masculine and feminine projects as I have with my two layouts. The first is a masculine layout using both the papers and chipboard from the collection.


Thanks for stopping by, until next time happy crafting!

(C) 2023 Julie's Craft Haven. All Rights Reserved.