"Thank You for Being You Card" by Julie Schinkel
Hi everyone! Today I'm sharing a card that I created using the soon to be released C'est La Vie Collection from Couture Creations, designed by Tina Higgins.

To start, take two cream square cards and cut the front in half diagonally. The second card should be cut in the opposite direction to the first. Adhere the backs of the card together. This is what should end up with.

Take Page 2A from the 12x12 paper pad, cut the top and bottom word strips off so you're left with the centre piece. Measure to the size of the front card flaps and trim down. Ink all edges (I've used Victorian Velvet) and adhere as shown.

Next, take Page 12A from the 12x12 paper pad. This will cover the inside of the card. Measure, trim, ink and adhere as shown.

Using that same paper, cut a piece to the width of the back of the card by approximately two inches. Ink and adhere using 1/4 inch double sided tape around the edge of two sides and the bottom. Adhere to the back panel to form a pocket.

Take Page 9A from the 6x6 paper pad and cut down so it fits into the pocket. Ink all edges.

Take that same panel, some rose gold mirror foil and the 'Thank You for Being You' hotfoil stamp and line up where you want the sentiment to be. Adhere with washi tape.

Gently flip and place on your GoPress'N Foil Machine. When heated, run it through your die cutting machine. This is the result. Adhere this panel to some cream cardstock.

Take the pale yellow butterfly from the ephemera pack and add some glue to the body and three dots on the wings. Once the glue is tacky, press some rose gold foil onto the glue. Ink and adhere the butterfly to the sentiment piece as shown. Add a row of three 3cm pink pearls to the top left and bottom right corners.

Take some cream seam binding ribbon and adhere across the centre of the pocket. Adhere some Diecut'N Bond Tape to some cream cardstock. Die cut two pieces using the Rosy Corner Decorative Die, remove the backing and press rose gold mirror foil onto each die cut piece. Adhere to opposite corners of the pocket. Take the ephemera piece that is the same as the panel picture, trim to fit and adhere in the centre. Make a double loop bow from seam binding ribbon, ink and adhere a rose on top of the bow as shown. To finish add a large pink pearl at the ends of the ribbon.

To embellish the front of the card, take some cream lace and adhere to each of the front panels as shown. Add some medium pink pearls - use a strong adhesive with these when adhering to lace to ensure they don't fall off.

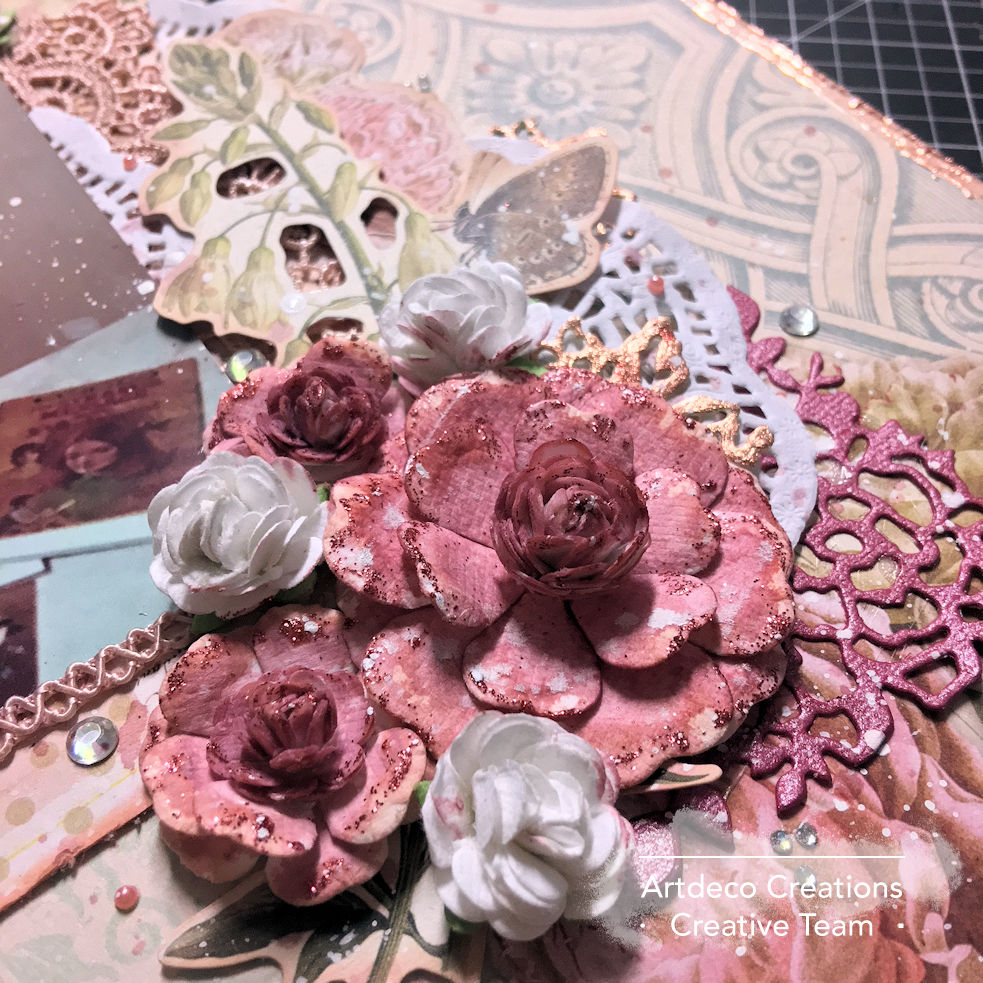
Using the same piece of cardstock with Diecut'N Bond Tape, die cut a piece using the Classy Flower Decorative Die from The Ritz Collection. Remove backing and press rose gold mirror foil onto the die cut. Adhere onto a piece of muslin. Next, adhere a metal flower from the L'Aquarelle brass elements set. Ink three roses and adhere to form the main cluster. Make a double loop bow from some thin cream ribbon and adhere to the cluster to finish.


PRODUCTS USED TO CREATE THS PROJECT:
C'est La Vie Collection
CO725738 6x6 Paper Pad
CO725739 Diecut Ephemera
CO725756 Rosy Corner Decorative Die
Couture Creations Products:
CO725828 Everyday Sentiments For Being You Hotfoil Stamp
CO724846 Cream Square Cards
CO724289 2cm English Roses
CO724290 1.5cm English Roses
CO724297 3cm Camden Cottage Roses
CO725703 Rose Gold Hotfoil
ULT157644 Diecut'N Bond Tape
CO721997 Pink Blush Pearls
CO725380 2mm Soft Pink Pearls
ULT157858 The Ritz Classy Flower Decorative Die
ULT157766 L'Aquarelle Filigree Brass Elements Set
ULT157770 L'Aquarelle Seam Binding Ribbon
ULT157639 Ooh La La Ribbon & Lace Pack
Other:
Victorian Velvet ink
scrap cardstock from stash
ribbon/muslin from stash
Victorian Velvet ink
scrap cardstock from stash
ribbon/muslin from stash
Thanks for stopping by, I hope that you enjoyed this tutorial.
Until next time.
Happy Crafting!
Until next time.
Happy Crafting!