Saturday 29 July 2017

Let Everyday Be Christmas - It's Not a Christmas Layout

Saturday, July 29, 2017 0 Comments
#artdecocreations   #couturecreationsaus    #ultimatecrafts  

Hi everyone! It's Julie here back on the blog today sharing a layout I created using the Let Everyday Be Christmas collection from Couture Creations. This is a simple layout to show how you can use the beautiful ephemera and dies to create a non Christmas layout.


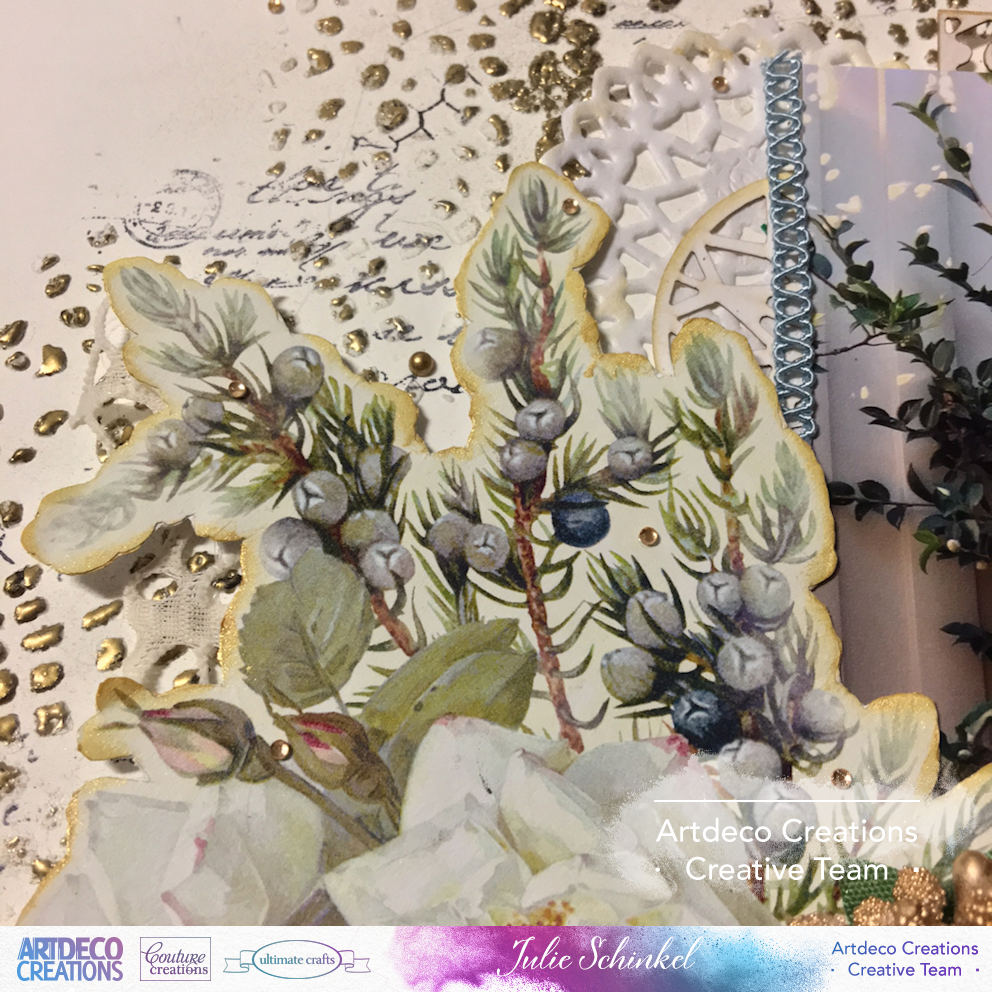
For this layout base, I've taken a piece of Ultimate Crafts Ivory Cardstock, worked out placement for my photo and embellishments, then lightly traced around them in pencil. This would be my guide for mixed media placement. Next, I've taken a stencil and lightly added some of the Couture Creations Anna Griffin Embossing Paste onto the page, following the penciled outline. This will create a "frame" around my photo and embellishments. I've then sprinkled some Couture Creations Chunky Gold Crystals Embossing Powder over the embossing paste and allowed to air dry before using the heat gun to set. I wasn't worried about being too careful with the stenciling as I wanted to create a random, distressed look. This is the result


Next, following the embossed patten, I've randomly stamped around the page page. I've mostly used the "Postcard" stamp from the Ultimate Crafts Magnolia Lane "Magnolia Lace" Stamp Set as it's perfect for this technique. All stamping has been done using black archival ink.


I then took a die cut of the Let Everyday Be Christmas Christmas Baroque Background Die in ivory cardstock and an Ultimate Crafts Ooh La La Collection Heart Doily. I cut one third from the bottom left of the die cut and onr third from the right of the doily. Both pieces were also edged with gold ink to tie in with the ephemera pieces. These will form the mat for your photograph and adhered onto the layout as shown below.


Next, I took two large pieces from the Let Everyday Be Christmas Ephemera Pack and inked around the edges with gold ink. I adhered these two pieces in an "L" shape using foam tape to form the main embellishment feature on the layout. My apologies, I thought I had taken a photo of them placed on the layout but didn't. You'll be able to see the placement in the full layout photo.


I've then taken one of the Couture Creations Camden Beaded Cottage Flowers and lightly added some Couture Creations Glitzen Glamour in Aztec Gold. I did this by squeezing some product onto my finger and lightly dabbing the flower. I've done the same with the other flowers on the layout which are the Couture Creations Camden Cottage Roses and the Couture Creations Tie Dyed & Jewelled Flowers. I've adhered the flowers using both Couture Creations Craft Glue Spots and 3D Glue Spots.


I have used an alcohol marker to colour the stone and add some colour and dimension to the jewelled flower. I decided to add some more diecuts so I've used both the Let Everyday Be Christmas Winter Corner Mini Die and the Let Everyday Be Christmas Stained Glass Mini Die, cut from ivory cardstock and inked with gold ink. The corner die cut was placed on the bottom right under the floral embellishments. Some gold stems from the Couture Creations Be Merry & Classic Gold & Silver Bouquets were added to both flower clusters to add a pop of gold and also tie all of the gold in together.


The stained glass die was cut in half and placed on the layout as show in the photos below.


I can't do a project without bling so I've randomly added some Couture Creations 2mm Gemstones in Champagne and Couture Creations 3mm Pearls in Glamorous Gold. To finish, I added some bits of trims from my stash to complete the layout.


Other Products:
Gold Ink
Archival Ink
Stencil
Yellow/Gold alcohol marker
Background/Texture stamps
Trims from stash

Thanks for stopping by, I hope that you enjoyed this tutorial.
Until next time.
Happy Crafting!


Monday 17 July 2017

Let Everyday Be Christmas Card Set

Monday, July 17, 2017 0 Comments
#artdecocreations   #couturecreationsaus    #ultimatecrafts  

Hi everyone! It's Julie here back on the blog today sharing a set of cards that I made using the Let Everyday Be Christmas collection from Couture Creations. There are so many wonderful dies in this collection so I thought I would create a project to showcase some of them for you.


I wanted to create a coordinating set of cards so I started with six of the Couture Creations A6 Cards in Cream. I then selected papers from the Let Everyday Be Christmas A4 Paper Pad, cut them down to size and inked around the edges using gold ink. There are two coordinating papers per card.


Next, I selected various dies from the collection and began arranging them on the cards. Here is what I came up with.

Card No. 1
I used the Snowflake Doily Die and cut this out using A4 Mirror Board in Gold Matte with Lines. I also used the Hanging Greetings Decorative Die and cut with the gold matte board. I cut off the hanging part and used it on another card. That way I could use the sentiment in the centre of the snowflake popped up using foam tape. The snowflake has been embellished with Couture Creations 2mm Gemstones in Maraschino and Champagne.


Card No. 2
For this card I cut the top piece of paper down to a square and matted it onto Ultimate Crafts Ivory Cardstock. I cut the Jingle Bells Decorative Die - twice in A4 Mirror Board in Gold Matte with Lines and Ultimate Crafts Garnet Cardstock. I offset the garnet cardstock to give the appearance of a drop shadow and to make the image pop. This is where I have used the hanging half of the Hanging Greetings Decorative Die leftover from the previous card. I cut another for the bottom in the same gold matte board to add balance then added some Couture Creations 2mm Gemstones in Maraschino and trim to embellish.


Card No. 3
As for the previous card, I cut the top layer down to a square and matted with Ultimate Crafts Ivory Cardstock. This has been adhered using foam tape for some dimension. I cut the Merry Christmas Decorative Die in both A4 Mirror Board in Gold Matte with Lines and Ultimate Crafts Garnet Cardstock. I've offset the two diecuts again to give a drop shadow affect and make it pop. I also cut two Winter Corner Mini Dies from the gold matte board and placed underneath the top layer. Lastly I've added some Couture Creations 2mm Gemstones in Maraschino, trim and bling to finish.


Card No. 4
This is where things get interesting. I took the top later and cut it in half. I didn't mat this one as the diecut used forms the mat. This was done using the Elegant Band Die from Ultimate Crafts Rambling Rose Collection. I cut this with the A4 Mirror Board in Gold Matte with Lines then cut the diecut in half and adhered to the back of the top layer. I added my trim to the top layer before adhering the diecut mat. This whole piece was then adhered to the bottom layer using foam tape. I cut the Flourished Joy Decorative Die from gold matte board and Ultimate Crafts Garnet Cardstock and offset them before adhering. One piece of bling was added to the trim to finish.


Card No. 5
This one is pretty basic. All I have done is diecut the Bauble Wreath Decorative Die twice, again from A4 Mirror Board in Gold Matte with Lines and Ultimate Crafts Garnet Cardstock and offset. I adhered the diecut using Couture Creations 3D Glue Spots for a bit of dimension. I used these instead of foam tape as they fit perfectly behind the larger baubles. You could also use foam dots/sqaures. I then added random gemstones and bling to embellish the wreath and finish off the card.


Card No. 6
For this card I took the top layer and cut it in half then matted onto Ultimate Crafts Ivory Cardstock. I took some cream ribbon and created a bow embellishment at the bottom. Using the Latticed Panel Die from Ultimate Crafts Rambling Rose Collection, I cut it out using A4 Mirror Board in Gold Matte with Lines and adhered it to the left side of the panel. You may have to trim this slighly depending on your panel size. I the cut the Flourished Joy Decorative Die twice, in gold matte board and ivory cardstock, offset and adhered to the top panel. I've added some gemstones to both panels and also to the diecut itself to finish off embellishing the card.


Other Products:
Gold Ink
Gemstones/Bling from stash
Ribbons/Trims from stash

Thanks for stopping by. Happy Creating!


Monday 3 July 2017

Artdeco Creations - Be Yourself Layout

Monday, July 03, 2017 0 Comments
Hi everyone! I'm super excited to be sharing my very first project as part of Artdeco Creations Creative Team for 2017/18. I'm honoured to be a part of this team and be creating for Artdeco Creations, a local company based here in Brisbane, Australia.

Today I'm sharing a mixed media layout featuring an upcoming collection designed by the talented Denise Boddey. This collection is called "Bohemian Bouquet" from Ultimate Crafts and it's gorgeous! The blues, reds and yellow toned pages give you so many options - either use them separately or combine them to create a bright, colourful project. Here is my layout and steps to showing you which tools and products to use and how I created it.


I took some Couture Creations Anna Griffin Matte Texture Paste and mixed it with some Couture Creations Anna Griffin Mix and Match Pigment Powder in Blue


I then took the Field of Daisies 6x6 stencil and applied the paste in randomly on white cardstock, from the top left down to the bottom right of the page. Rotating the stencil when applying pastes/sprays gives more variation to the pattern. There is no rule saying that you have to use the stencil in the same direction each time, so go for it and experiment. That's what creativity is all about.


Next I took some more of the Couture Creations Anna Griffin Mix and Match Pigment Powders in Pink and Red and mixed them together to get the tone matching the colours used in the papers. I then added water to the pigment powders and created splatters across the page with a paintbrush. I didn't add water to the page itself, I let it dry as it so the colours wouldn't muddy.


Next up I chose three papers from the 6 x 6 paper pad and randomly tore them to create a mat for my photo. The "clean" edges were distressed to match the torn edges. The more distressed the better.


The dies in this collection are simply gorgeous and it was hard to choose which ones to use. I ended up choosing the Curling Floral Decorative Die and Orchid Decorative Die dies as they best complimented the pieces from the Diecut Decoupage Set that I used on this layout. I die cut these using blue glitter cardstock and pink foil cardstock. You could also use Couture Creations foils for these as well. I cut the blue die cuts in half so I could arrange them better on the layout.


I took some Ornate Corners chipboard pieces from the collection and covered them with Ultimate Crafts Liquid Drops 3D Pearl in Flamenco. I squeezed some out onto a Couture Creations non stick craft mat and by using my finger, lightly covered the chipboard to give it a hint of colour and compliment the rest of the embellishments on the layout.


And here is my finished layout along with some close ups showing how I arranged the embellishments. I can't do a layout without some bling, so I randomly added some Couture Creations 2mm Gemstones in Pink Lace and mixed gemstones in Blue Iceberg. I also added some Blue Iceberg gemstones to the chipboard pieces as well. The quotes are from the 6x6 paper pad which I cut out and "inked" with the Flamenco  Liquid Drops. I randomly stamped across the page using stamps from the "Be Yourself" stamp set using black archival ink.


Artdeco Creations Products Used:

Other Products:
Pink Foil Cardstock
Black Archival Ink

Thanks for stopping by. Happy Creating!


Saturday 1 July 2017

White.. With 1 July Challenge

Saturday, July 01, 2017 0 Comments
Hi everyone! Today I'm sharing my July inspirational piece for White.. With 1. The colour for July is Lavender Lane and there is also a mood board for inspiration too.


https://whitewith1.blogspot.com.au/2017/07/welcome-to-july.html

White.. With 1 challenges require your layout to be at least 85% white PLUS the specified challenge colour for that particular month. You can use black (or dark brown) as an accent colour on your layout but it must not be the dominant colour, unless it is the specified colour for that month. The full WW1 challenge rules can be found here. This year there will also be either a mood board for inspiration or a sketch to follow.

White.. With 1 Challenges are sponsored by:


You have a chance to win an EXCLUSIVE Mystery kit from THE RESIN RAINBOW based each month on our own monthly colour here at White..with 1.  One of these amazing kits will be put aside for one lucky Australian / New Zealand entrant who will be chosen by creative team vote.

 
Our random draw winner up each month will receive a delightful selection of handmade embellishments, flairs and flowers (chosen from amongst these) from SCRAPPERS GARDEN.  Some beautiful creations here and available from her STORE.


Thanks for stopping by!
(C) 2023 Julie's Craft Haven. All Rights Reserved.