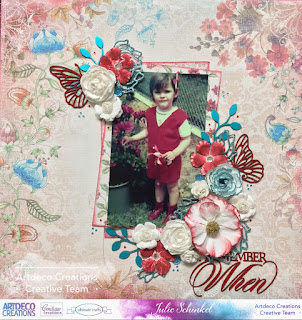
Remember When Layout
#artdecocreations #couturecreationsaus #ultimatecraftsHi everyone! It's Julie here back on the blog today sharing a simple layout that I created using the new release "Bohemian Bouquet" collection from Ultimate Crafts, designed by Denise Bodey. I absolutely love this collection! There's four colour combinations and designs that you can use separately or mix and match for some added contrast. The possibilities are endless!
I started by taking two of the patterned papers from the 12x12 paper pad. The floral print was cut into two pieces slightly larger than the photo which is a 4"x6" trimmed down. Edge the 12x12 piece and photo mats with red ink.
The "Remember When" chipboard sentiment and Butterfly chipboard piece have been heat foiled using red matte foil. The butterfly has been cut in half and placed in each flower cluster. The wavey branch chipboard has been heat foiled using sea breeze mirror foil. I trimmed the branch down into three smaller pieces and added to the flower clusters.
The flowers clusters have been made from the following flowers and also embellished using various products:
- The Camden Beaded Cottage Flower has been inked around the edge using red ink
- The Tie Dyed & Jewelled Florettes have been inked with red ink by pressing the flower directly onto the ink pad and gently rubbing it across the pad. This will give a "distressed" look to the flower.
- ONE of the 3.5cm English Roses have been colouring using blue pigment powder mixed with a few drops of water onto a not stick craft mat and gently painted with a paint brush.
- The Camden Cottage Roses, the remaining two 3.5cm English Roses and the 2cm English Roses I've left white but lightly added some Crystalina Glitzen Glamour to give them a little sparkle and shine.
I've cut some glitter paper using the Orchid Box Die from the collection, then trimmed the four "flowers" off. These were placed in amongst the flower clusters. The fourth flower has been cut in half before being added to the bottom cluster.
To finish I've added some 2mm gemstones and some gems from my stash. Refer to the close up photos below to see how I have coloured the flowers and arranged the clusters on my layout.
PRODUCTS USED TO CREATE THS PROJECT:
Bohemian Bouquet Collection
ULT158030 12x12 Paper Pad
Artdeco Creations Products:
CO725343 Baby Blue Glitter Paper
CO725692 Sea Breeze Foil (Mirror Finish)
CO724287 White English Roses (3.5cm)
CO724289 White English Roses (2cm)
CO724297 3cm White Camden Cottage Roses
CO724300 White La Belle Vintage Blooms
CO724292 4cm White Tie Dyed & Jewelled Florettes
CO724153 Azure 2mm Gemstones
CO725543 Blue Mix and Match Pigment Powder
CO721971 Glitzin Glamour - Crystalina
Other Products:
Red ink
Blue gems
Thanks for stopping by, I hope that you enjoyed this tutorial.
Until next time.
Happy Crafting!
Until next time.
Happy Crafting!


No comments:
Post a Comment