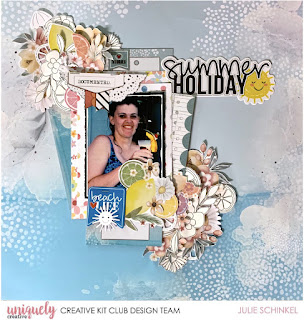
Hi everyone, today I'm sharing a tutorial blog post created for Uniquely Creative using the Summer Days collection. This collection is perfect for summery beach and holiday
photos. The original tutorial can be seen on the Uniquely Creative blog HERE.
1. Use a piece of Day at the Beach paper as the base.
2. Distress the edges of your photo using a sanding block. Matt onto
some black cardstock cut and trim down with a deckle edge trimmer or
deckle scissors.
3. Adhere onto a piece of the Summer Cocktails paper, trim down to leave a quarter inch border.
4. Adhere onto a larger piece of the Garden Party paper again trimming down leaving a quarter inch border.
5. Pick the two blue cards from the 6x4 Pocket Pack. Cut down as
shown, these will form the matting layers underneath the photo. I didn’t
end up using the two middle pieces, but you can still include these if
you wish.

6. Adhere all of the pieces to form the photo mat cluster as shown.

7. Adhere some elements from the Creative Cuts, Cut-a-Part Sheet, and
the Watercolour Cut-a-Part Sheet and Citrust Blooms Fussy Cut paper as
shown. Attach the “Document” and “Beach Life” elements right over the
printed staples on the image using a tiny attacher or stapler.

8. Die cut a few of each element from white cardstock using the Summer
Icons die set. Adhere one sun icon die cut to the “Beach Life” element.

9. Add the “Summer Holiday” title from the Creative Cuts to the layout as shown.
10. Add random die cut elements from the Summer Icons die set to the top and bottom clusters as shown.


Products Used:
UCP2305 Day at the Beach
UCP2301 Summer Cocktails
UCP2304 Garden
Party
UCP2307 Citrus Blooms Fussy Cuts
UCE1873 6x4 Pocket Pack
UCE2311
Creative Cuts
Cut-A-Part Sheet
Watercolour Cut-A-Part Sheet
UCD2028
Summer Icons Dies
Other Products Used:
Trimmer, Scissors
Adhesive Tape
Glue
Black Cardstock (for photo
mat)
White cardstock (for die cuts)
TH Deckle Edge Trimmer/Deckle
Scissors
Sanding Block
TH Tiny Attacher/Small Stapler
Die Cutting
Machine


No comments:
Post a Comment